Uber Skyscraper Technique TLDR
What is it?
Uber Skyscraper Technique is a powerful form of link building outreach that can earn you high-quality backlinks (and ultimately traffic) to your content.
With Uber Skyscraper Technique, you find a blog topic in Ubersuggest that has blog posts that already rank well, and have many unique backlinks to them. Then, you write a better blog post. After that, you use Postaga to reach out to these linking sites and have them replace their links with your newer, better, blog post url.
How to do it in Postaga:
Postaga has an automation that can help you build these Uber Skyscraper Technique campaigns with Ubersuggest. With Postaga, you can:
Enter in the target backlink URLs from Ubersuggest into a Custom URLs campaign
Find contact information for people at those websites
Reach out to these websites on Twitter to acknowledge them
Find these websites on LinkedIn to get on their radar
Reach out to them via email to suggest they swap in your skyscraper content in their relevant blog post
Uber Skyscraper Technique Link Building
This article breaks down a unique method of doing Skyscraper Technique link building that takes very little time.
Now, this is not the first article ever written about the Skyscraper Technique.
We know there have been many, many articles that discuss and walk you through how to do the Skyscraper Technique to build backlinks and get a ton more traffic.
So, this isn’t going to be another one of them.
We have something a bit different:
When Skyscraper Technique is usually pitched in blog articles, it barely mentions (if at all) how time-consuming it can be to run.
Typically, the formula for Skyscraper Technique is pitched as a way to get you more links to your blog posts (backlinks) and ultimately traffic to your website. The step-by-step process is:
Step 1: Do your blog topic research with a premium tool like Ahrefs, SEMRush, or Buzzsumo to find a topic, find top-ranking posts that have backlinks, and grab all their backlink URLs.
Step 2: Write a better blog post than the already-published posts on the topic.
Step 3: Find email addresses for the backlink URLs websites from Step 1.
Step 4: Send outreach emails to those websites.
And all of that is well and good, and can sound straightforward enough, but it can be incredibly time-consuming and cost you a lot of money to do right.
Why?
A few things:
With this strategy, you first need a premium SEO and backlink research tool, like Ahrefs, SEMRush, and Buzzsumo.
While premium SEO tools have a ton of features and are great for Skyscraper outreach, they aren’t inexpensive.
And if you’re thinking of running a few Skyscraper Technique campaigns to test the waters with link building outreach, it’s not a very cheap proposition.
Ahrefs, SEMRush, and Buzzsumo all start at $99 / month.
And as for the second piece of the puzzle – Skyscraper Technique can be incredibly time-consuming.
For every website you want to ask for a backlink from, you have to find an email address and then reach out to them.
That means sending dozens to hundreds of individually-personalized emails.
So, looking at all that, there has to be a better way, right?
A way that helps you do outreach that’s low-cost and not time-consuming?
Yes, and that’s what we’re going to break down.
This easy and quick method of the Skyscraper Technique (we’re gonna call it the Uber Skyscraper) leverages two tools: Ubersuggest and Postaga.
Ubersuggest is an SEO tool that does keyword and domain research. You can enter in a keyword, see its estimated searches, what sites are ranking for the keyword, and see what sites link to those sites. Beyond that, it also has suggestion tools for keywords and content.
Postaga is an all-in-one link building outreach tool that helps you research opportunities, find contacts, and send personalized outreach email sequences to your target contacts.
How We Do “Uber Skyscraper” Technique Outreach with Ubersuggest and Postaga
Let’s quickly review the steps to Skyscraper Technique:
Step 1: Do your blog topic research to find a topic, find top-ranking posts that have backlinks, and grab all their backlink URLs.
Step 2: Write a better blog post than the already-published posts on the topic.
Step 3: Find email addresses for the backlink URLs websites from Step 1.
Step 4: Send outreach emails to those websites.
Step 1 is going to be all in Ubersuggest.
Step 2 is going to be with your trusted word processing software.
And Steps 3 and 4 are going to be all with Postaga.
So, let’s get started.
Step 1: Topic Research and Backlink Profiles
To do Skyscraper Technique, you need to first find a blog topic worth skyscraper-ing.
In Ubersuggest we start by entering a keyword or a domain.

For this example, let’s use “best sandwiches” for a food-focused blog.

Next, we get to an overview screen that gives us a lay of the land.
In the sidebar on the left side of the page, we can click on the “keyword ideas” to get for more suggestions and details.

Now, we have a table of suggested keywords along with their search volume and search difficulty (also some pay-per-click related details, but those are not as relevant for us).
If we click on a keyword, we also see a sidebar to the right side of the page that shows us a table of the top-ranked websites for those keywords.

And in that table is a column for links!
In the links column, you can click on the number of links for a particular website and get a list of all the websites linking to that post.
In this example, I’m gonna click on the “58” in row #3.

Now, I can see all the backlinks to this website that’s ranking for “best sandwiches near me.” (scroll down on this page).

And now the link heist begins!
We can click “Export to CSV” to download all the URLs in a CSV file.
We’re going to use this later
Step 2: Write a Great Blog Post
Next, we need a great blog post.
Problem solved.
Now you have a great blog post that’s better than anything else out there and people will want to link to.
It’s important to stress that your content must be better than what is already published out there.
Otherwise, there’s little incentive for anyone to want to swap out their preexisting link for your content.
Step 3: Finding Contacts in Postaga
Next, we’ll go into our Postaga account to find our contacts.
First, we create a new campaign and choose the Custom ampaign type, selecting Custom URLs.
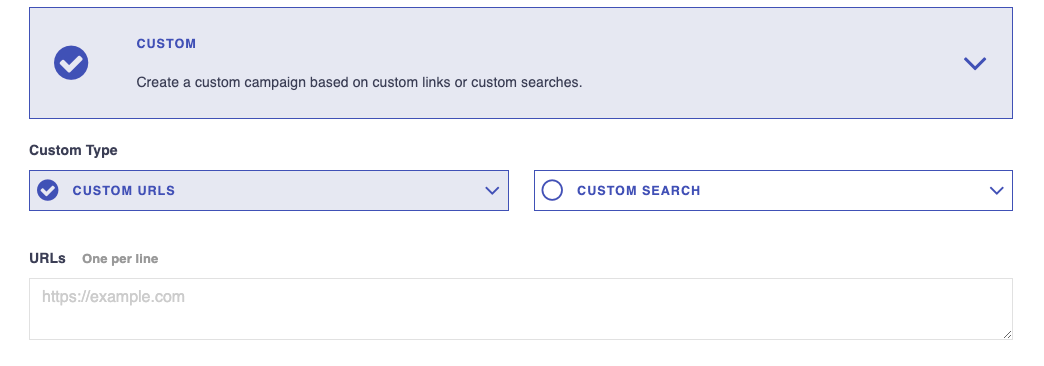
Now, we’ll need those Ubersuggest backlinks.
You will need to go into your CSV of the exported backlinks and copy the URLs under the column “Source URL.”
I use Google Sheets, so I’ll drop the CSV into my Google Drive account and open them as a Google Sheet.

Once you copy the column of links, paste them into the Custom URLs box in Postaga.

Then, click Analyze Links.
Links
Postaga will then give you a list of the links to the websites you selected, along with a target contact for each website.

Here, you have options for Basic Configuration and Advanced Configuration.
First, let’s review Basic Configuration.
Postaga will automatically try and find the best fit contact for each website.
As an example, for a blog post, that will usually mean the author of that post. Otherwise, Postaga will look for its determination of the next best-fit contact.
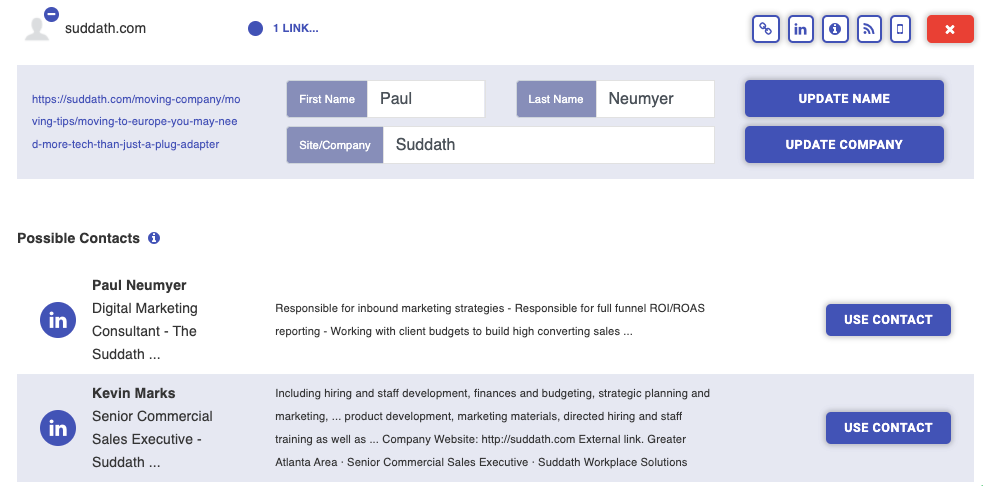
You can review each website and contact by clicking the "1 link" button, on a specific contact, which will then show you the target contact for that website.
The First Name, Last Name, and Site/Company fields are all editable.

If you would like to search for a different contact, Postaga can help there too.
If you see a + symbol next to the website, you can click it, and you will get results of other contacts at the website that you can choose from. Then, if you click the Use Contact button, you can select that contact.
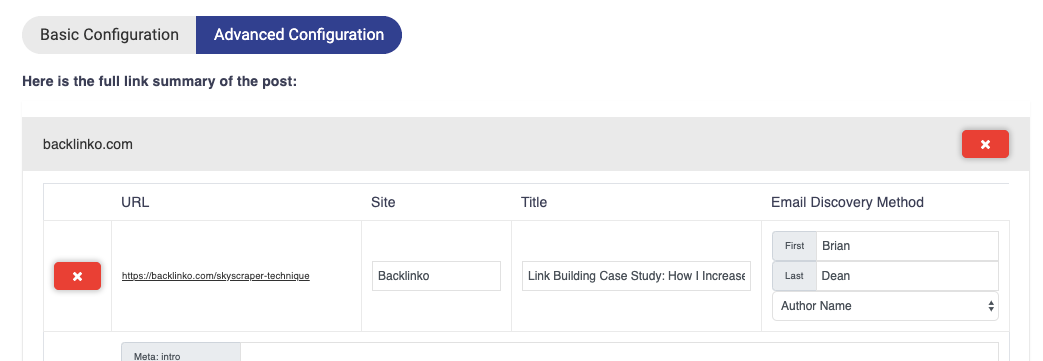
Next, there’s Advanced Configuration.
In Advanced Configuration, you are presented with every merge field for the website, including custom merge fields. You can fill these boxes if you want, or do that later.
Once you are satisfied, click the Get Contacts button.
Now, you will see the contacts.
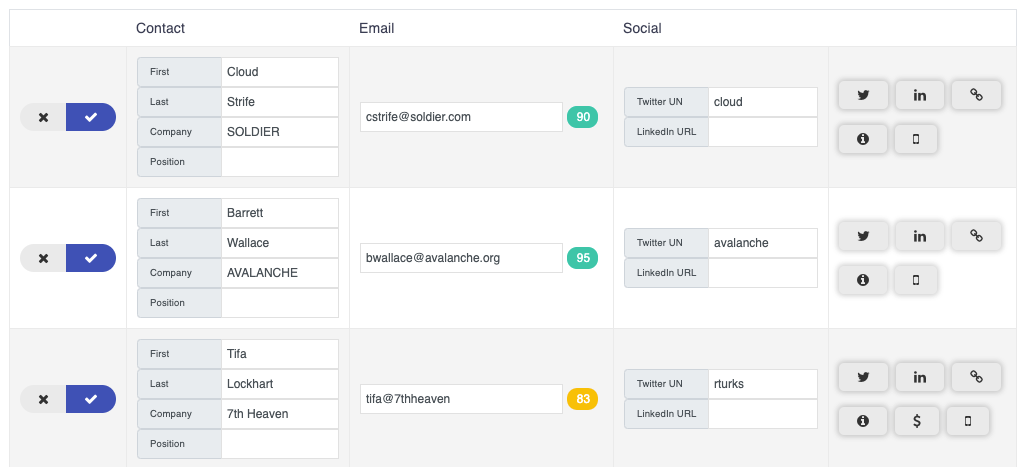
On the left side of the screen, next to each contact, is a checkbox. With the box selected, that individual contact will be added to your email sequence.
Though you will see email addresses for each contact, some information may not be available, such as name, company, position, social media handles, or any custom contact merge fields.
If you would like, you can supplement that information and add that to contacts by filling it in the appropriate text boxes.
Also, you can edit existing contact information text boxes. As an example, if the Company Name returned is Acme Company, Inc., but you want to just refer to the company in merge tags as Acme, you can edit that field as needed.
Next to each email address found is a numerical contact score. This indicated how confident we are that the email address is accurate. If the contact score shows as red, you can click the score to bring up a validator and try to validate the email through Mailgun.
To the right of each contact are icons for Twitter, Linkedin, the original link, and a few other key pages at that contact’s website.
If a Twitter handle is provided , clicking the Twitter icon will load up a default tweet, presuming you are already logged into Twitter. Otherwise, it will perform a Google search for the Twitter handle of the contact.
If a LinkedIn url is found clicking the LinkedIn icon will load the contact’s LinkedIn profile. Connecting with a contact on LinkedIn before emailing can be a great way to increase response rates. If a LinkedIn url is not provided, clicking the icon will perform a Google search for the contact’s LinkedIn profile.
Clicking the link icon will take you to the original link.
You can also toggle between Basic Configuration and Advanced Configuration to make edits to all available merge fields.
Once you are satisfied with the outreach contacts, you can move onto editing the email sequence.
Email Sequence
Next, you will choose an email sequence for your contacts.
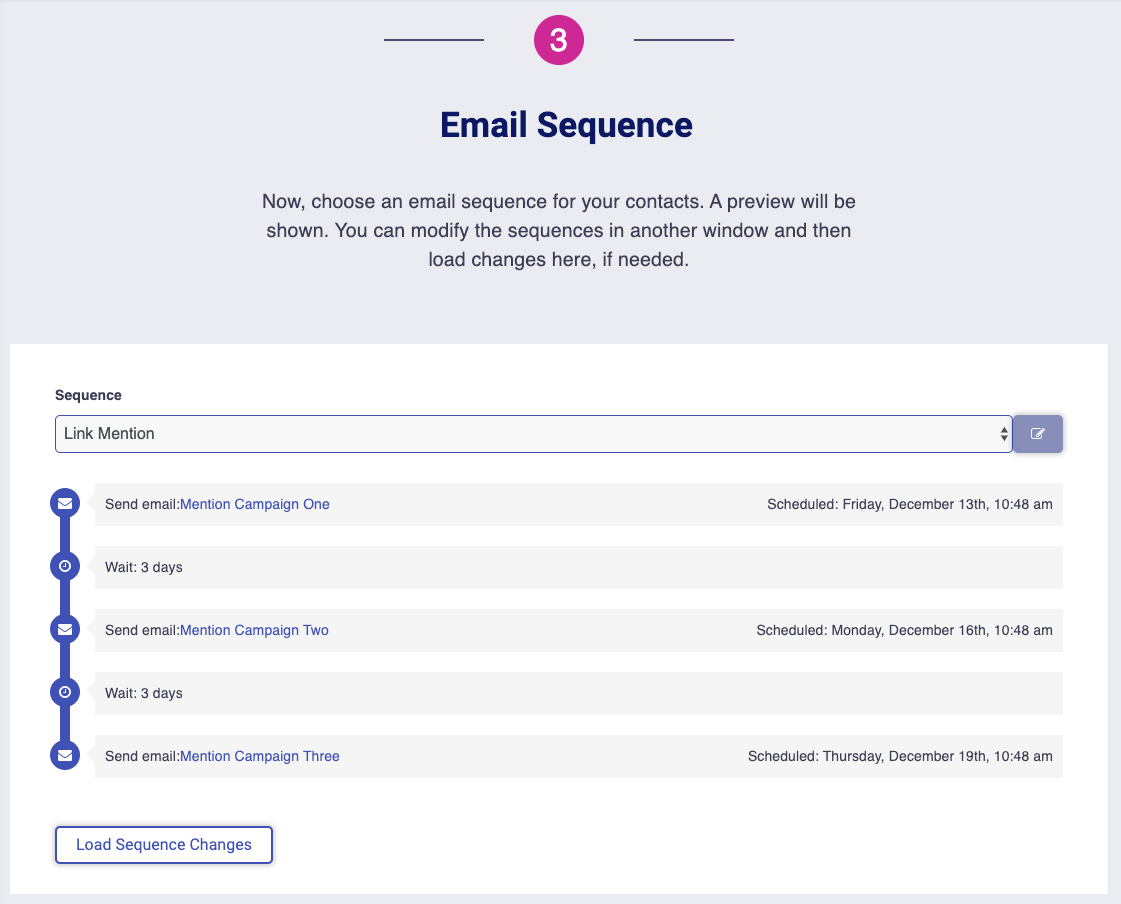
Email sequences available to you will include any sequences that you created and assigned to this particular campaign type, sequences assigned to “any” campaign, as well as template sequences created by Postaga.
Once you select a sequence from the drop-down menu, you will see the sequence laid out on the screen.
If you are not happy with the sequence, you can always modify the sequence by going to Sequences in another window by clicking the edit button to the right of the selected sequence. Then, you can edit the sequence, save it, and then reload the sequence section in you campaign by clicking the Load Sequence Changes box below the sequence.
Related Help Doc: Sequences
Email Preview
Next, you will see an email preview section with the email templates of the sequence you selected.
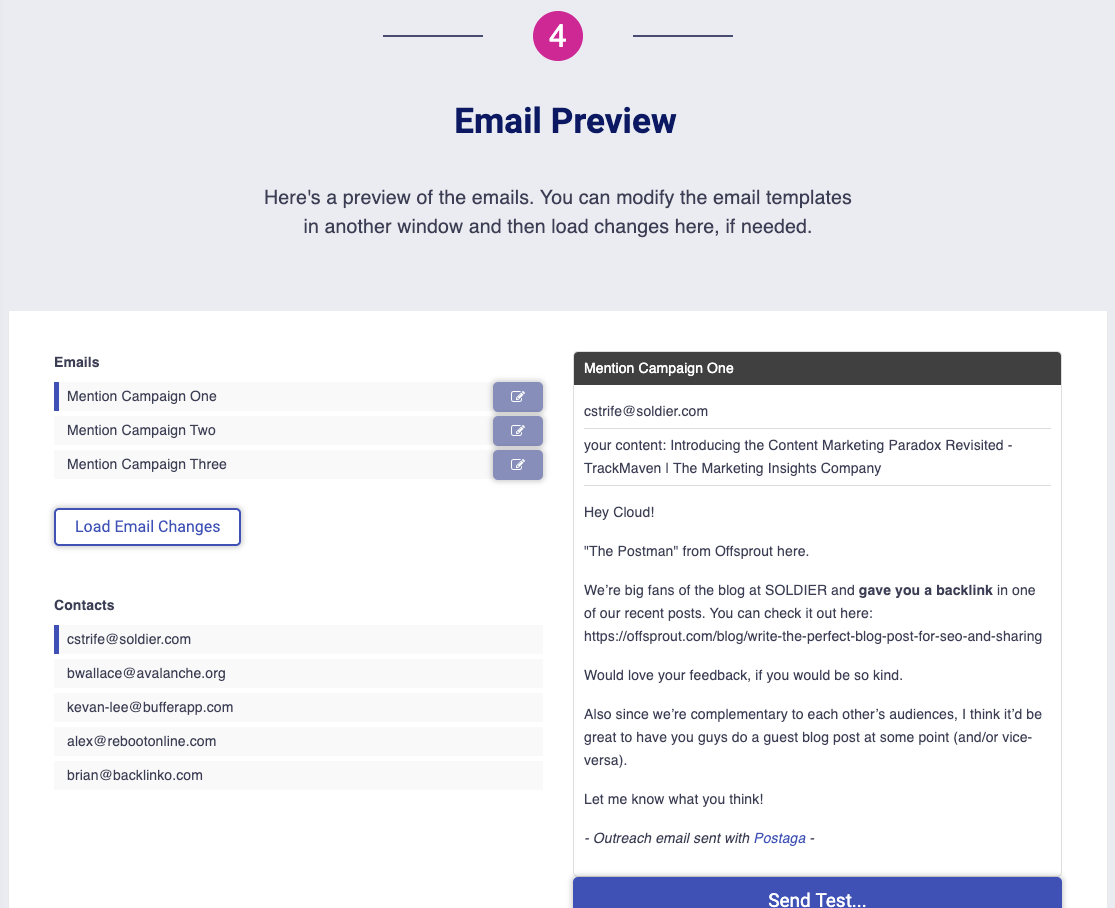
On the left side of the page are the list of emails as well as contacts who will receive each email. If you click on a specific contact as well as a specific email, you will see that email as it will send to that specific contact in the preview pane on the right side of the page.
If there are merge fields used in your email template, they will fill with the supplied information in the preview pane.
However, you may also see merge tags in red. If you see red merge tags, it means that Postaga does not have data for these merge fields. You can always go back and provide that information to see how the revised email will look with the new information.
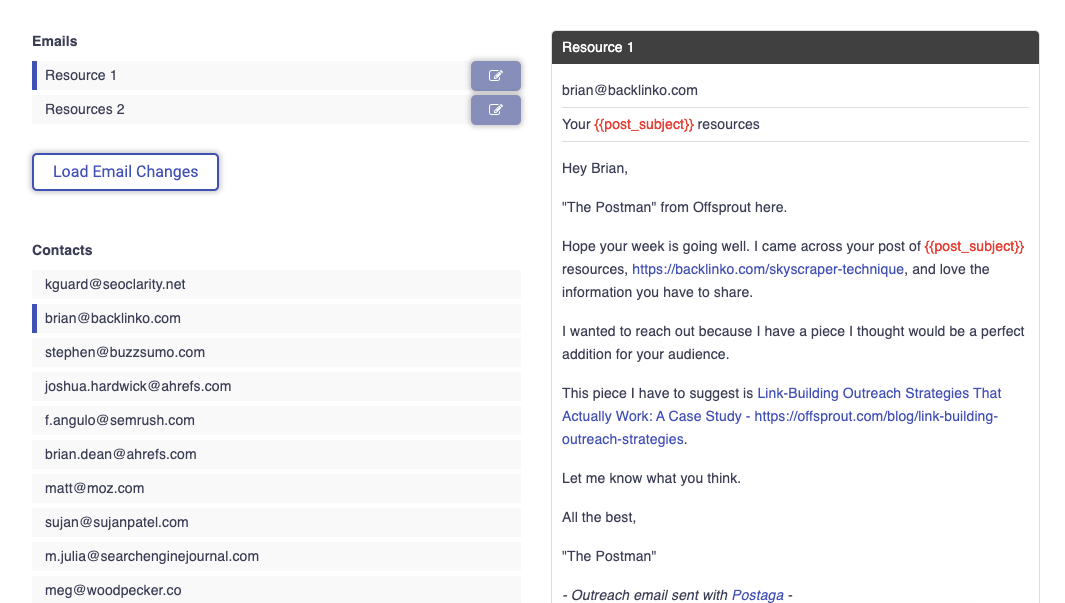
Alternatively, you can edit the email by clicking the edit icon to the right of the email, then clicking the Load Email Changes button to see how the revised email will look. Any changes here will affect the template, and therefore, every message using that email template.
It should be noted that red merge tags do not show up in outreach emails. If there are any red merge tags when you send out your campaign, they will disappear from the outreach email and your contact will not see anything where the merge tags would have been.
You can overwrite individual emails in this section as well. To do so, just hover over the email, and you will see the screen darken and an edit icon appear. This will let you edit an individual email in the sequence, related to the contact that is highlighted in the left side of the screen.
Once you click the edit button, a modal window will pop up, allowing you to edit that unique email.
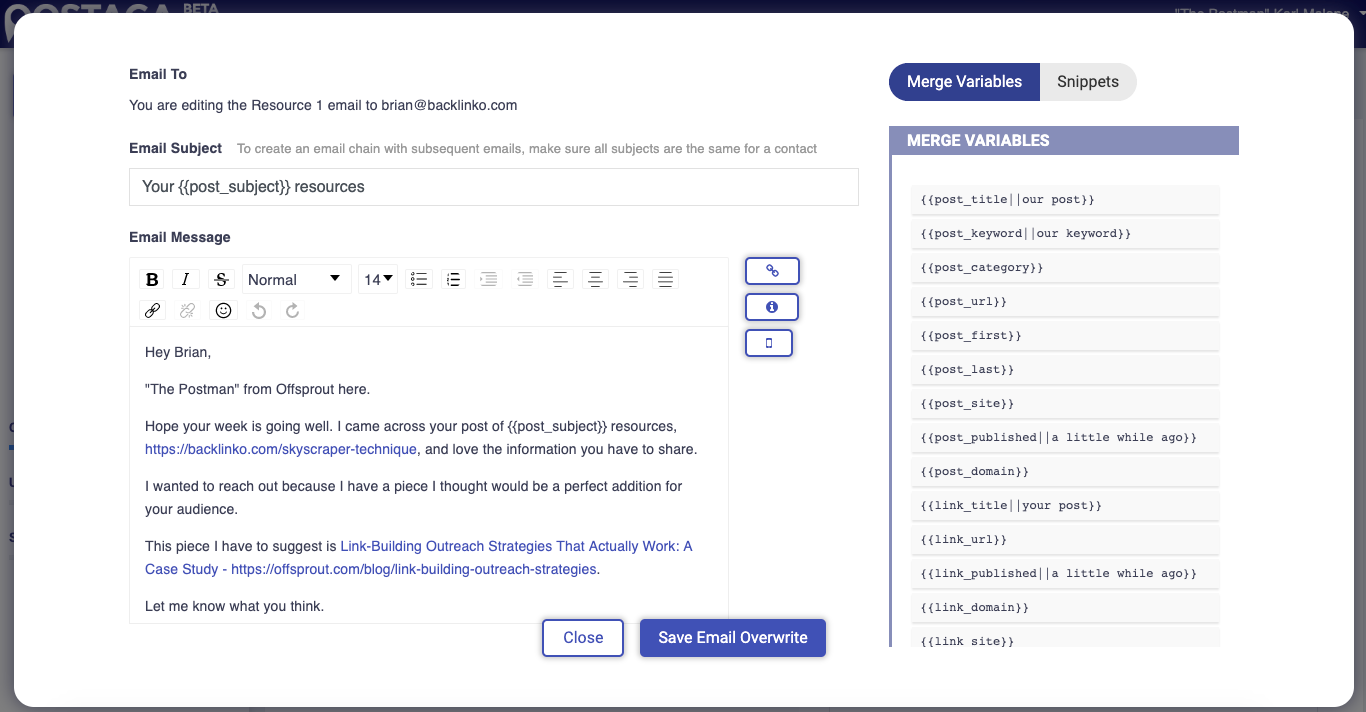
One cool feature to note here is that you can insert unique snippets to your personalized email. For example, let's say you want to mention something specific on your contact's website that you appreciated. Postaga's AI pulls mention-worthy snippets from your contact's post or URL, so you can paste it in your message.
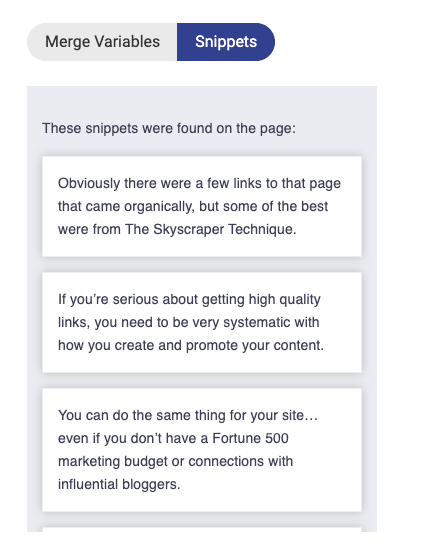
Once you are happy with the edits you have made, click the Save Email Overwrite to save the individual email, or Close to undo any changes.
To send a test email, click the Test Email button below the email in the preview pane. Then, enter the email address for the test and click send.
Rules and Scheduling
Next, you will set the rules and schedule for your email.

The Schedule button has a checkbox option. If you select it, you will be able to schedule your sequence to run at a given day and time. If not selected, the sequence will run as soon as you click the Launch button at the end of this campaign screen.
If you select a schedule, click the text box under Start Date to select a start date and time.
Below the schedule button is a Testing Mode button. If selected, the email sequence will send all the emails to your test email address, but not your actual target recipients. This is generally used for situations where you want to confirm what emails people will receive, though you can also do this in the Email Preview section.
There is also a Send on Weekends option that you can select. If it is not selected, your email sequences will only send on Monday through Friday; any emails that would have been scheduled to send on a weekend day will send on the first following weekday (e.g. if scheduled for a Saturday or Sunday but “Send on Weekends” is not selected, it will send on Monday).
There is also a rule for Stop on Reply. If selected, the sequence will stop for a specific recipient if they reply to any of your emails. For example, if I have an email sequence with 5 emails, and a recipient responds to my 2nd email in the sequence, the sequence will stop for them and they will not receive emails 3, 4, or 5.
Track Opens lets you know if your email opens are being tracked. If you have configured your Postaga account fully, this should say “Opens are automatically tracked.”
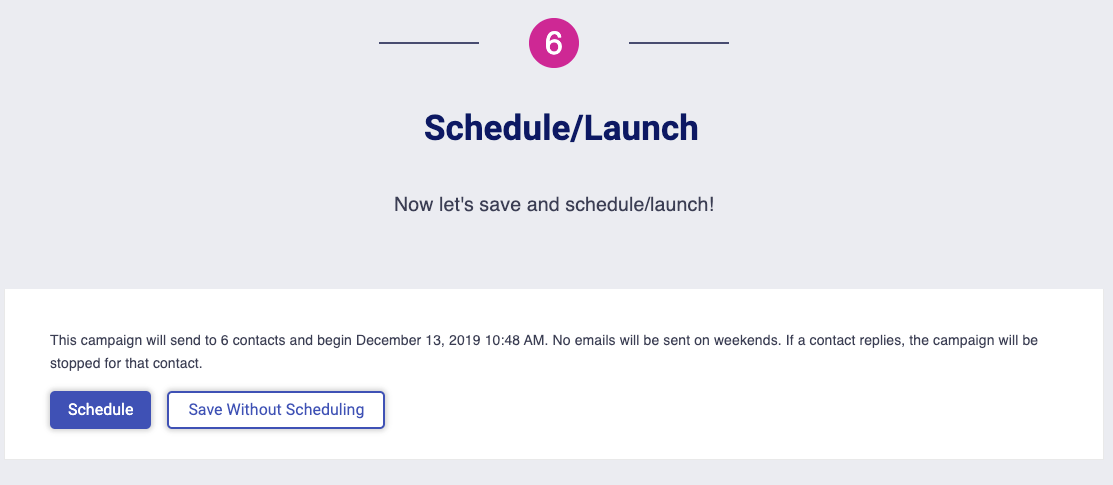
Schedule and Launch
With your campaign created, it’s time to launch your campaign.
Some Pro Tips for Successful Skyscraper Technique and “Uber Skyscraper”
A challenge with the Skyscraper Technique is that it is very well-known at this point.
The high % success rates you see on Skyscraper-explaining blog posts from 2015 or 2017 are not realistic for anyone starting with Skyscraper in 2020.
Because Skyscraper is so well-known, the email outreach is not novel anymore.
Websites get bombarded with requests for backlinks every day.
So many people use the same template outreach emails, and recipients hate that.
So, if you want to have any success, you need to stand out.
For emails, this means that you can’t use the tired formula of ‘Hey I wanted to let you know that I wrote a blog post that’s better than the one you linked to, so you should link to mine instead.”
Here are a few things that help my emails stand out and get responses:
- Emojis in subject lines and email body text
- Humor
- Being direct
Emojis in Subject Lines and Email Body Text
As of publishing this, I am still testing this one out, but have had some good success so far.
An emoji in a subject line stands out.
And it also suggests to the recipient that you are not a robot using some automated mail merge or anything (even if you can use emojis in email outreach apps like Postaga).
Using emojis can come across as playful or clever, and, in my limited experience testing it out, I get fewer emails saying “ABSOLUTELY NOT. GO TO HELL!” than I normally do.
Humor
Being clever can get you far.
If you can make your recipient chuckle to themselves, they will be more likely to want to help you out.
I try to make light of the situation: “Hey, I am definitely reaching out to you for a backlink. I know you probably get this all the time. But, if you do this, I will be your best friend. I am a great best friend to have. I have references!”
You know, cheesy stuff like that.
Being Direct
No one has time for your soft introductions of saying “Hey, I really appreciate your content” anymore.
Be to-the-point.
One email format that really resonated with me as a recipient was one where the subject line was “Another Email Asking for a Backlink” and the email text had headings like “What I want from you” and “What you get from me.”
It was perfect, actually.
The subject line stood out to me. It was both direct and also kind of funny.
Overall, it cut to the chase and didn’t waste my time with fluff about how my blog is amazing.
—
And that about wraps this thing up for Uber Skyscraper. Try it out, let us know how it works for you!
Free 14-Day Trial
Start building relationships now with your fully-featured 14-day trial!
How We Compare
Terms | Done-For-You Terms | Privacy | Write For Us | Press
© 2025 Postaga. All Rights Reserved. Made with 
