Podcast Outreach TLDR
What is it?
Podcast Outreach is when you reach out to podcasts to appear on as a guest. It’s also known as “podcast guesting”, “guest podcasting” or “doing a podcast tour.”
Getting on podcasts can be a great way to promote your business or brand and get you exposure from a new audience who may not be familiar with you or your company.
To do podcast outreach right – you will need a good way to prospect for different relevant podcasts, and a good pitch.
Postaga can help with podcast outreach.
How to do it in Postaga:
Postaga has an automation that can help you build podcast outreach campaigns, finding contacts relevant to you, and then building personalized email sequences at scale. Postaga can:
Find websites podcasts in your industry or topic
Get contact details for the right people at those podcasts
Reach out to them via email to pitch your idea for a guest spot
Podcast Outreach in Detail
Note: This entire outreach process that follows can be done entirely within Postaga. Below, we’re going to share exactly what the outreach process entails and our top tips for success, whether or not you are using Postaga.
Getting interviewed on podcasts can be a great way to increase your exposure to new audiences and help you get in front of new potential customers.
But, landing a podcast interview can be a challenge.
First, you have to find relevant podcasts.
Then, you have to get contact information for those podcasts.
And then you have to craft a personalized pitch email to make them want you to appear on their podcast.
It can be a process, but there is a right way to do it.
I’ve been doing this type of outreach for awhile now and have been featured on podcasts recently including The Agency Profit Podcast, LMSCast, Content Champion, and more.
Let’s talk about how it works.
How We Do Podcast Outreach
So, let’s do some Podcast Outreach.
First, we need to find some relevant podcasts on our topic.
Prospecting
There are a few ways you can do this research:
You can do it with Postaga (which we’ll talk about shortly).
Or, you can do it with your preferred search engine of choice.
For this example, I am going to focus on a SEO podcasts.
And for this example, Let’s say we are an SEO agency that wants to connect get onto SEO-focused podcasts with a pitch around content marketing for SaaS businesses.
So, how do we find SEO focused podcasts, and a lot of them?
We can do it with Google and some creative searching.
There are lots of online directories that list podcasts in different categories.
So, one search that I like to start with in a given category is “Best SEO podcasts”

Great.
Now I have a bunch of articles and directories of different SEO podcasts I can prospect.
Next, I’ll go to each of these directories and copy the podcasts into a spreadsheet.
I will have a column for podcast name and one for website URL.
And that takes care of prospecting.
Next, we need to find contacts.
Contacts
One you have the URLs for the websites you’re going to reach out to, we need specific contacts to reach out to.
To do this, we can leverage Hunter.io, a free email address-finding tool. Enter the website URL, and Hunter.io will return email addresses, if they have any for that website.
You can copy those into your tracking spreadsheet in a column for First Name and Last Name (we do this because you probably don’t need to use people’s last names in the greeting, like “Hey John Smith.”
And then we’ll repeat this process for every website we want to reach out to.
Messaging
Next, we need to draft our outreach email.
A few tips on drafting an email that will get a response:
- Have a relevant subject line like – “Podcast Guest?”
- Personalize your email so you show the recipient that you know who they are and that your content is relevant to their tools page.
- “Sell” your guest with a brief summary that shows how it is relevant to their audience, and what you can do to help promote their podcast as well.
Here are some more tips on drafting the perfect outreach emails.
Here’s an example of an email format that I’ve used with great success, tailored to our “SEO” concept:
Subject: Podcast Guest?
Hey Samantha,
Your podcast was recommended to me so I have a few episodes of The SEO Podcast queued up – I’m excited!
Are you open to a guest slot / interview on your podcast in the next month or so?
If so, I’d love to come on and do an episode aimed at content marketing for SaaS businesses.
Here’s a real quick overview of why it’d be a great fit for your audience / podcast…
- I run a large digital marketing agency focusing exclusively SaaS businesses where we have helped over 300 SaaS businesses with their content marketing
- Having reviewed your podcasts, I see that you have a lot of great content on SEO, but less specific content about content marketing and SaaS businesses
- I have an audience of over 10,000 subscribers I would be happy to share your podcast with
Let me know what you think.
Happy to answer any questions you may have and look forward to meeting you!
Here to help,
Andy
Now, let’s break down why this email works.
First – the subject line is straightforward.
Next – I start off by demonstrating that I know who they are, so they know this is not a completely random generic outreach.
Importantly, I don’t say something like “I love your podcast!” Don’t ever say that unless you actually have listened to their podcast and can cite specific things that you like. Podcasters hear this line A LOT.
When doing podcast tours, I ask podcasters why they replied to my email, and what kind of pitches they get. They have nearly universally said something to the effect of:
“A very common pitch we get starts out with ‘I love your podcast’ but mentions nothing specific. Like, if you really love our podcast, please tell me what you love about it. We get this pitch a lot. It feels generic and insincere, and we ignore these pitches.”
Cold outreach emails are often terrible because they are using plain templates with no personalization. And they promptly get deleted because the recipient knows that they are not relevant.
So, by showing that I know who I am reaching out to, they understand that I am not going to waste their time.
Next – the brief sell. Here’s what I’m asking for and then I show why it is relevant to them.
In the pitch, I try to also show them exactly what’s in it for them – if they have me on their podcast, I will share it with my audience as well, so I’m not just looking to get something from them without doing anything in return.
If you are not already a “name” or a celebrity in your niche or space that is in-demand for interviews, demonstrating that you are willing and able to promote the podcast is important.
For podcasters, especially growing ones, they want their guests sharing their content.
But beyond the email, we should also have a follow-up.
Send a follow-up once every 5 days or every week. And that follow-up should just simply say:
“Hey {{contact_first}}, I wanted to see what you thought about my last email? Thanks for your time.”
That’s it. Real simple.
And that’s how it’s done.
Next, let’s go over how to run a Podcast Outreach campaign in Postaga.
Podcast Outreach in Postaga
First, we create a new campaign and choose the Podcast Campaign Type and click on Custom Search.
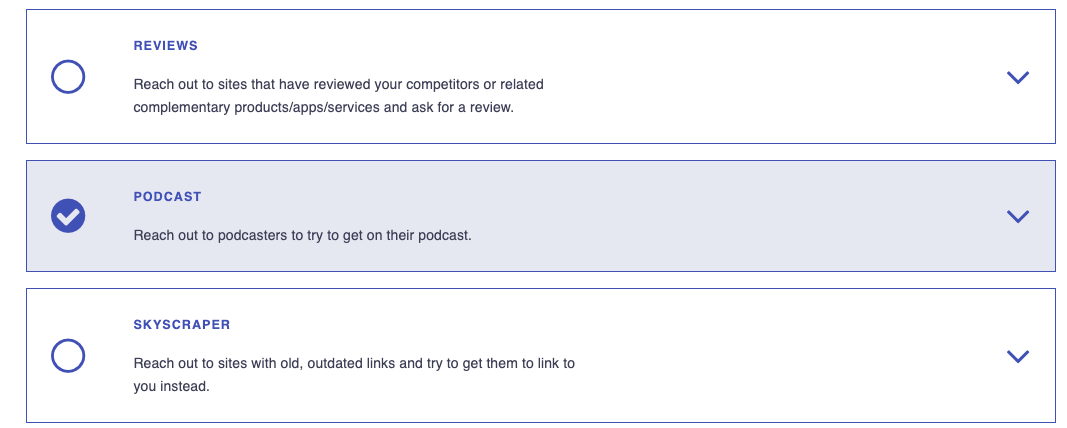
Search
Then, enter your topic, like “social media” or “cooking”. You may also want to do multiple campaigns, each focusing on a specific topic so you can cast a wider net.

You can try out different searches relevant to your product or service.
Once you make a search, Postaga will return results. On the left side of each result, you can check them to include them in your outreach.

You can also select all or select none.
Then, from the results, you can select the relevant podcasts you want to reach out to, get contacts, select your email sequence, and schedule the campaign to run.
Links
Postaga will then give you a list of the links to the websites you selected, along with a target contact for each website.

Here, you have options for Basic Configuration and Advanced Configuration.
First, let’s review Basic Configuration.
Postaga will automatically try and find the best fit contact for each website.
As an example, for a blog post, that will usually mean the author of that post. Otherwise, Postaga will look for its determination of the next best-fit contact.
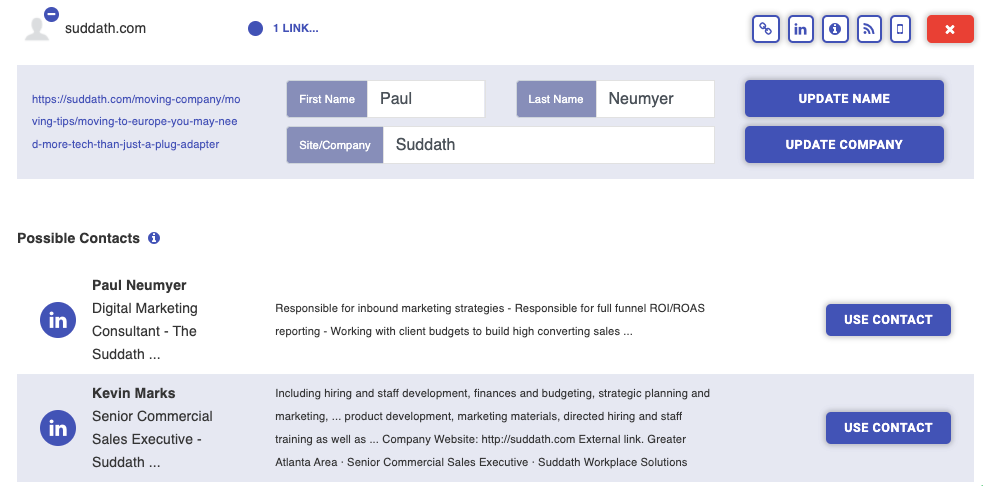
You can review each website and contact by clicking the "1 link" button, on a specific contact, which will then show you the target contact for that website.
The First Name, Last Name, and Site/Company fields are all editable.

If you would like to search for a different contact, Postaga can help there too.
If you see a + symbol next to the website, you can click it, and you will get results of other contacts at the website that you can choose from. Then, if you click the Use Contact button, you can select that contact.
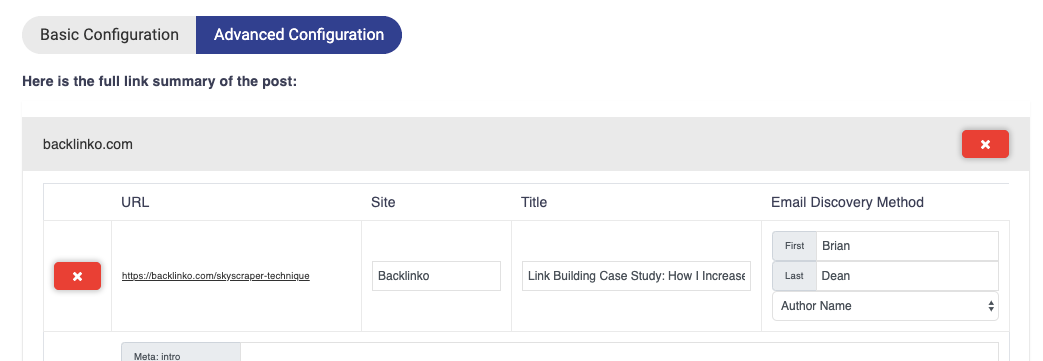
Next, there’s Advanced Configuration.
In Advanced Configuration, you are presented with every merge field for the website, including custom merge fields. You can fill these boxes if you want, or do that later.
Once you are satisfied, click the Get Contacts button.
Now, you will see the contacts.
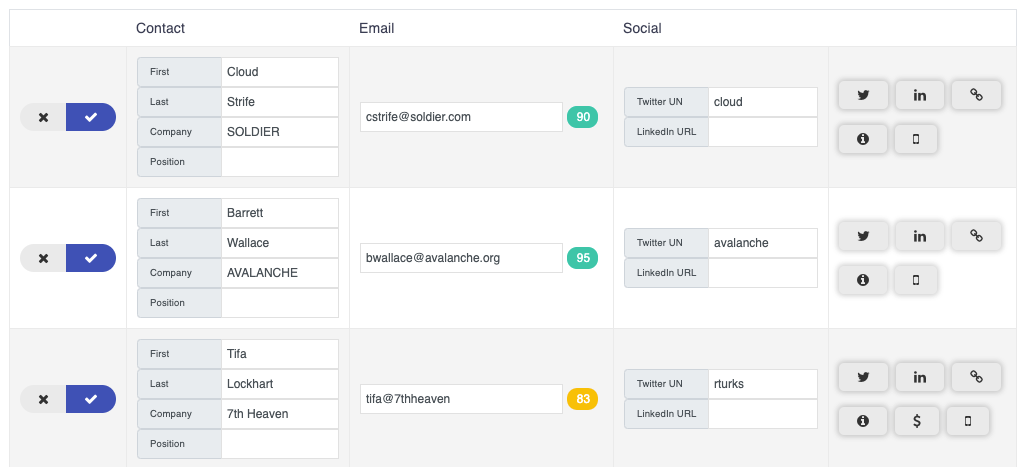
On the left side of the screen, next to each contact, is a checkbox. With the box selected, that individual contact will be added to your email sequence.
Though you will see email addresses for each contact, some information may not be available, such as name, company, position, social media handles, or any custom contact merge fields.
If you would like, you can supplement that information and add that to contacts by filling it in the appropriate text boxes.
Also, you can edit existing contact information text boxes. As an example, if the Company Name returned is Acme Company, Inc., but you want to just refer to the company in merge tags as Acme, you can edit that field as needed.
Next to each email address found is a numerical contact score. This indicated how confident we are that the email address is accurate. If the contact score shows as red, you can click the score to bring up a validator and try to validate the email through Mailgun.
To the right of each contact are icons for Twitter, Linkedin, the original link, and a few other key pages at that contact’s website.
If a Twitter handle is provided , clicking the Twitter icon will load up a default tweet, presuming you are already logged into Twitter. Otherwise, it will perform a Google search for the Twitter handle of the contact.
If a LinkedIn url is found clicking the LinkedIn icon will load the contact’s LinkedIn profile. Connecting with a contact on LinkedIn before emailing can be a great way to increase response rates. If a LinkedIn url is not provided, clicking the icon will perform a Google search for the contact’s LinkedIn profile.
Clicking the link icon will take you to the original link.
You can also toggle between Basic Configuration and Advanced Configuration to make edits to all available merge fields.
Once you are satisfied with the outreach contacts, you can move onto editing the email sequence.
Email Sequence
Next, you will choose an email sequence for your contacts.
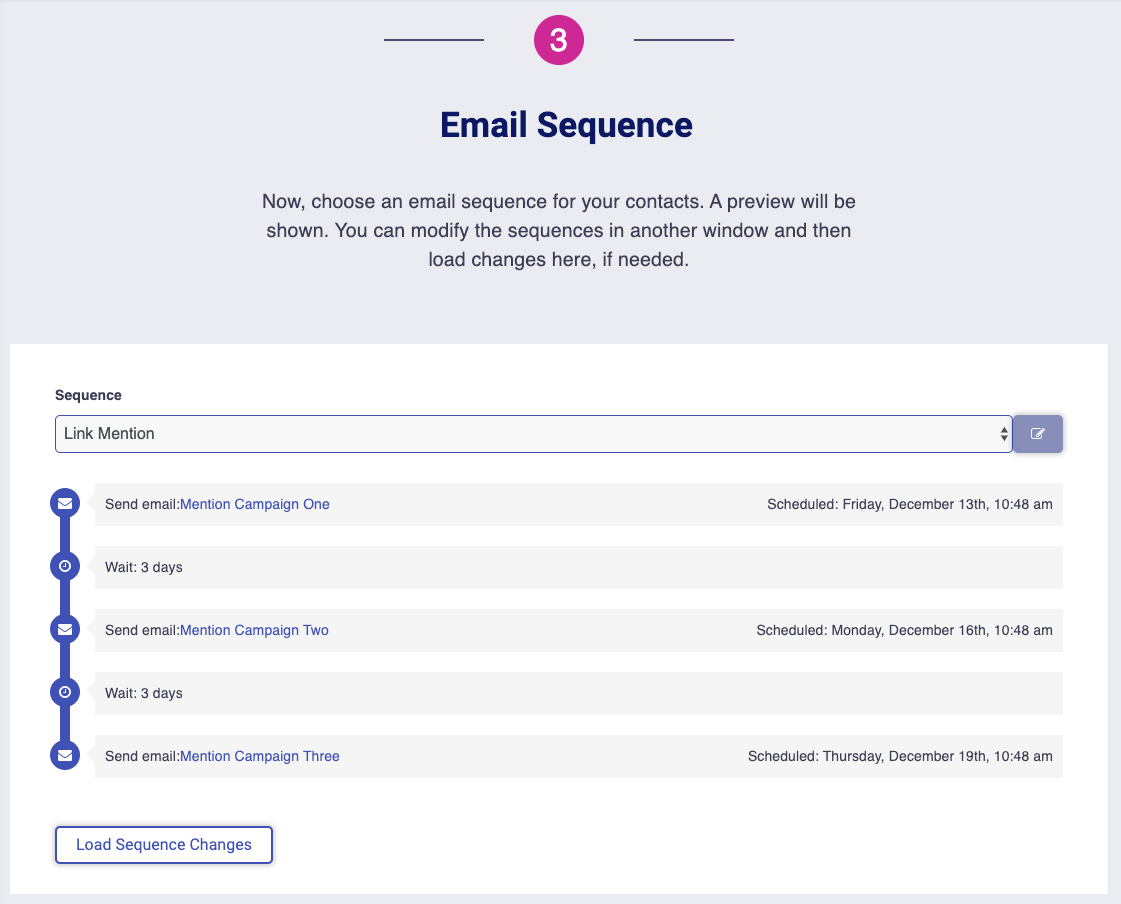
Email sequences available to you will include any sequences that you created and assigned to this particular campaign type, sequences assigned to “any” campaign, as well as template sequences created by Postaga.
Once you select a sequence from the drop-down menu, you will see the sequence laid out on the screen.
If you are not happy with the sequence, you can always modify the sequence by going to Sequences in another window by clicking the edit button to the right of the selected sequence. Then, you can edit the sequence, save it, and then reload the sequence section in you campaign by clicking the Load Sequence Changes box below the sequence.
Related Help Doc: Sequences
Email Preview
Next, you will see an email preview section with the email templates of the sequence you selected.
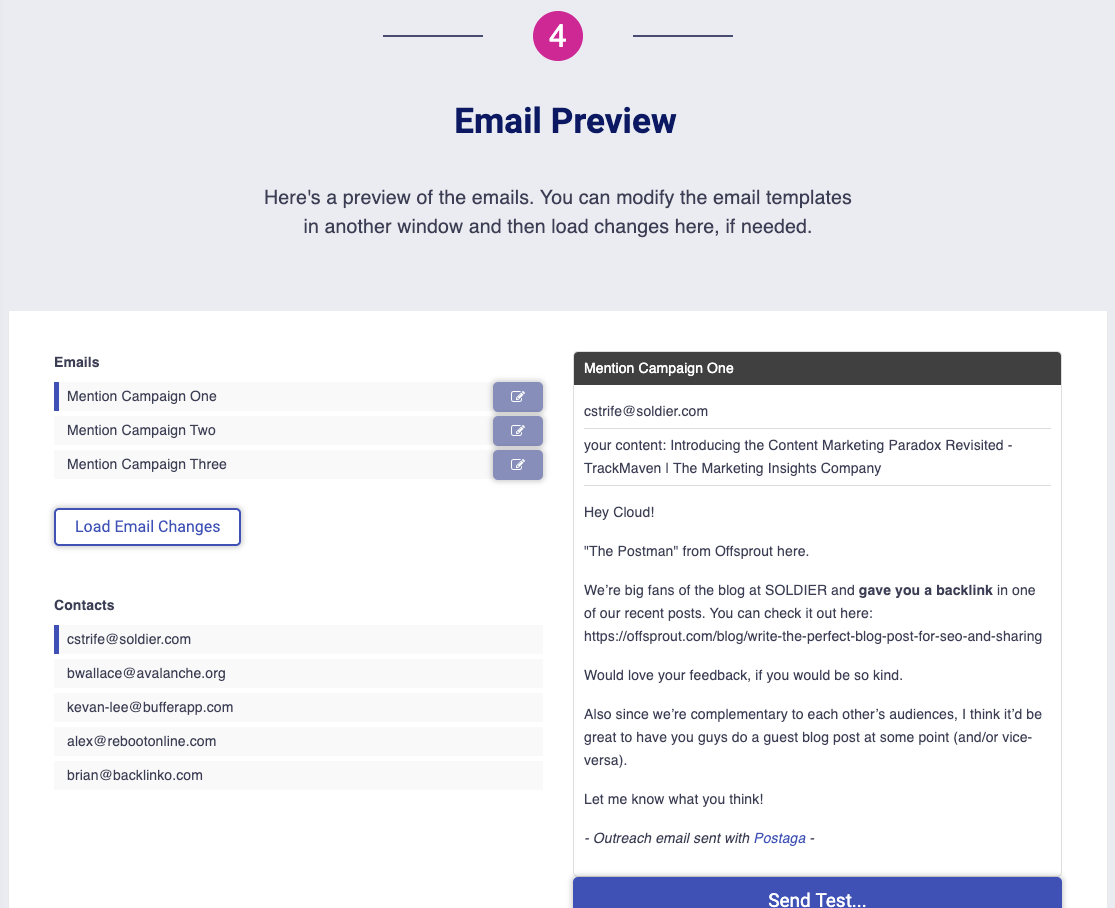
On the left side of the page are the list of emails as well as contacts who will receive each email. If you click on a specific contact as well as a specific email, you will see that email as it will send to that specific contact in the preview pane on the right side of the page.
If there are merge fields used in your email template, they will fill with the supplied information in the preview pane.
However, you may also see merge tags in red. If you see red merge tags, it means that Postaga does not have data for these merge fields. You can always go back and provide that information to see how the revised email will look with the new information.
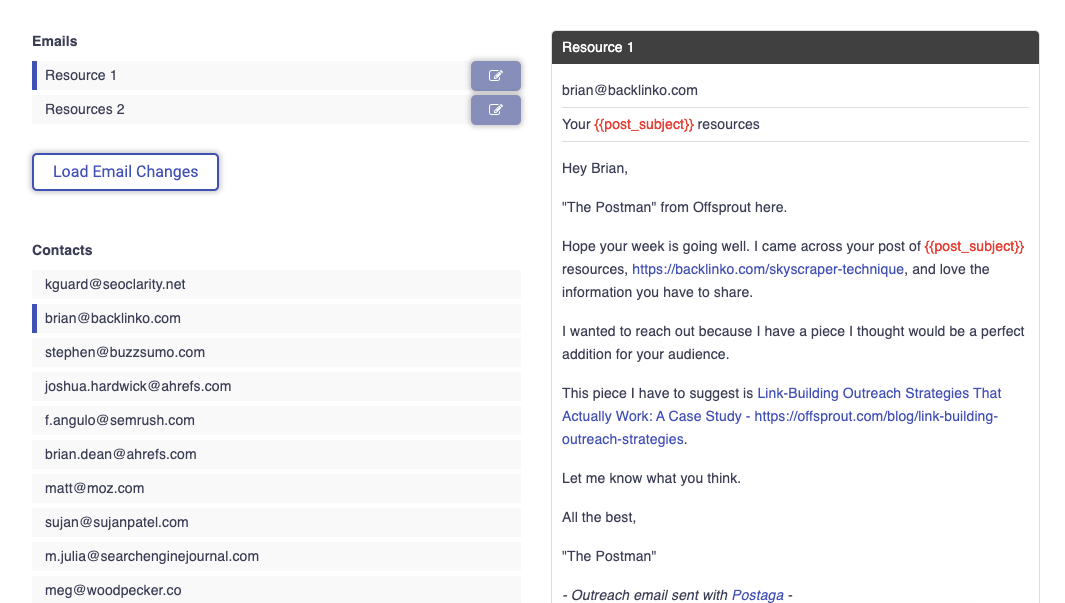
Alternatively, you can edit the email by clicking the edit icon to the right of the email, then clicking the Load Email Changes button to see how the revised email will look. Any changes here will affect the template, and therefore, every message using that email template.
It should be noted that red merge tags do not show up in outreach emails. If there are any red merge tags when you send out your campaign, they will disappear from the outreach email and your contact will not see anything where the merge tags would have been.
You can overwrite individual emails in this section as well. To do so, just hover over the email, and you will see the screen darken and an edit icon appear. This will let you edit an individual email in the sequence, related to the contact that is highlighted in the left side of the screen.
Once you click the edit button, a modal window will pop up, allowing you to edit that unique email.
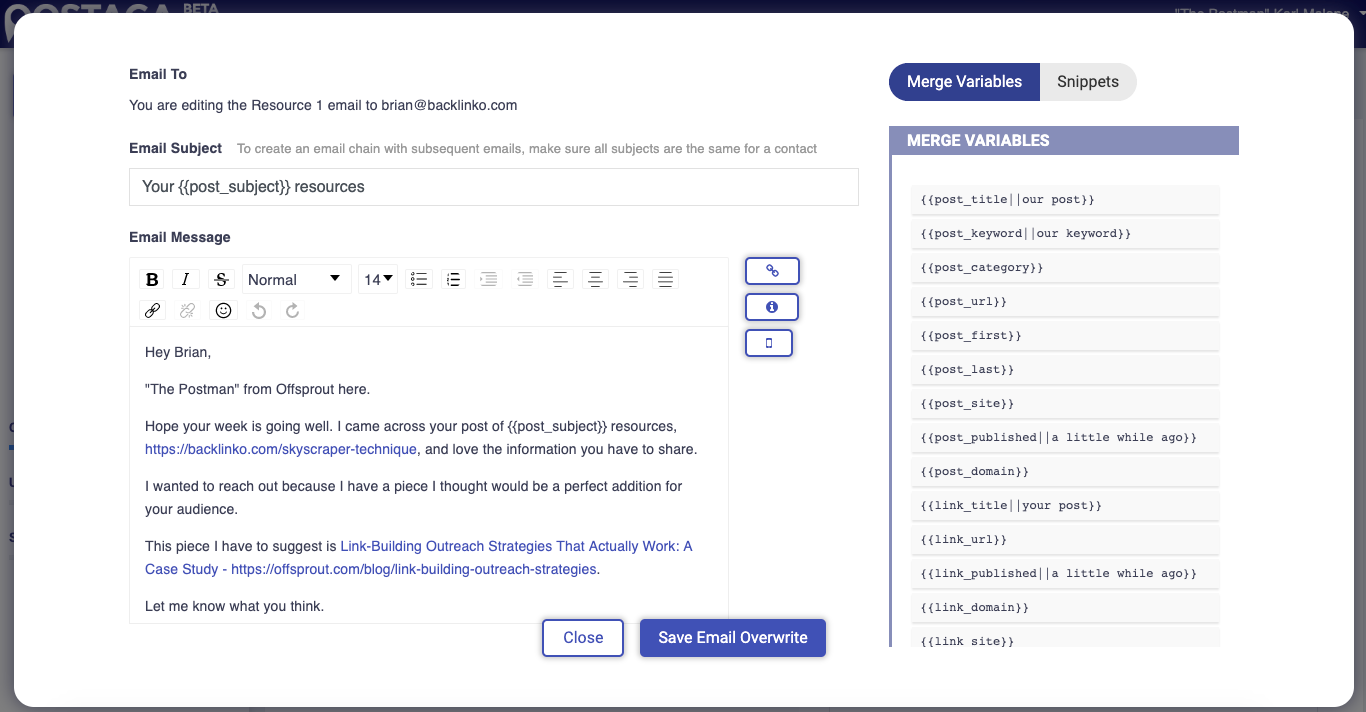
One cool feature to note here is that you can insert unique snippets to your personalized email. For example, let's say you want to mention something specific on your contact's website that you appreciated. Postaga's AI pulls mention-worthy snippets from your contact's post or URL, so you can paste it in your message.
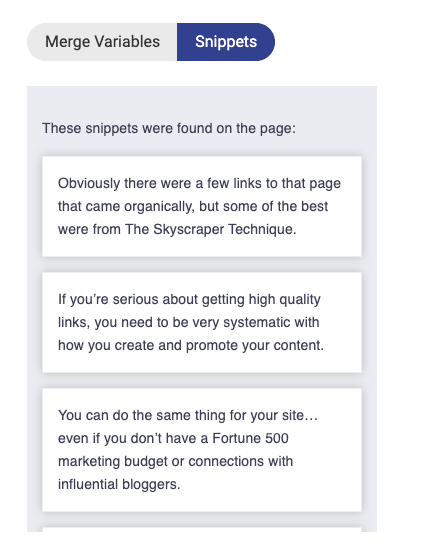
Once you are happy with the edits you have made, click the Save Email Overwrite to save the individual email, or Close to undo any changes.
To send a test email, click the Test Email button below the email in the preview pane. Then, enter the email address for the test and click send.
Rules and Scheduling
Next, you will set the rules and schedule for your email.

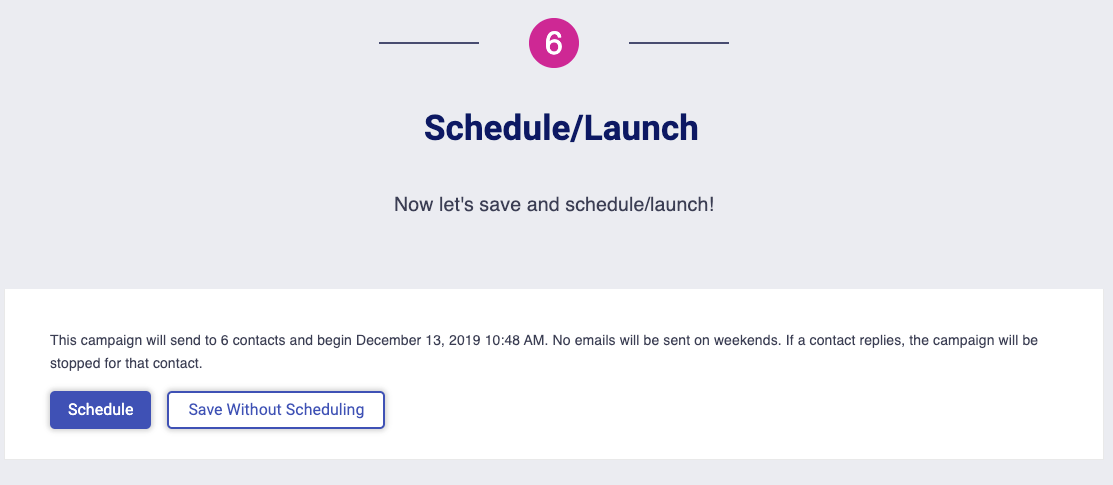
The Schedule button has a checkbox option. If you select it, you will be able to schedule your sequence to run at a given day and time. If not selected, the sequence will run as soon as you click the Launch button at the end of this campaign screen.
If you select a schedule, click the text box under Start Date to select a start date and time.
Below the schedule button is a Testing Mode button. If selected, the email sequence will send all the emails to your test email address, but not your actual target recipients. This is generally used for situations where you want to confirm what emails people will receive, though you can also do this in the Email Preview section.
There is also a Send on Weekends option that you can select. If it is not selected, your email sequences will only send on Monday through Friday; any emails that would have been scheduled to send on a weekend day will send on the first following weekday (e.g. if scheduled for a Saturday or Sunday but “Send on Weekends” is not selected, it will send on Monday).
There is also a rule for Stop on Reply. If selected, the sequence will stop for a specific recipient if they reply to any of your emails. For example, if I have an email sequence with 5 emails, and a recipient responds to my 2nd email in the sequence, the sequence will stop for them and they will not receive emails 3, 4, or 5.
Track Opens lets you know if your email opens are being tracked. If you have configured your Postaga account fully, this should say “Opens are automatically tracked.”
Schedule and Launch
With your campaign created, it’s time to launch your campaign.
Download our Podcast Guest Checklist
Get tips on what to do when you are invited to go on a podcast – advice form someone who’s been on 50+ podcasts.
Free 14-Day Trial
Start building relationships now with your fully-featured 14-day trial!
How We Compare
Terms | Done-For-You Terms | Privacy | Write For Us | Press
© 2025 Postaga. All Rights Reserved. Made with 

