3 Steps to Set Up DNS Records & Email Authentication for Microsoft 365

Using Microsoft 365 (formerly known as “Office 365”) to power your business email?
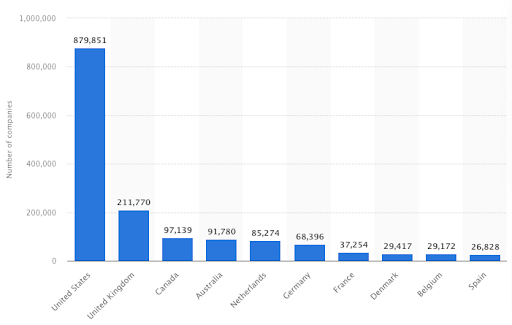
You’re in good company, with more than one million companies — including almost 900,000 in the US alone — choosing Microsoft’s subscription-based service.
But what if you use Microsoft / Office 365, but purchased your domain from a third-party hosting provider?
How do you set up the necessary email authentication protocols to prove that emails sent from your servers are legit?
Find out by reading our guide to DNS records for Microsoft 365…
What Are DNS Records?

Domain name system (DNS) records are instructions that connect machine-readable IP addresses (like 104.21.32.161) with human-friendly URLs (like postaga.com).
When someone types a URL into their browser’s address bar, their request is:
- Sent to an internet service provider
- Forwarded to the DNS servers
- Pointed to the web server, with the IP address used as a label
It’s kind of like Google Maps. Say you have a favorite chain of coffee shops. When you visit a new city, you don’t need to know the street address of your nearest branch — you simply type in the brand name and let Google do the hard work.
But DNS records are just about directing you to the correct web address. They also play a key role in DNS authentication, a combination of three email authentication techniques that help ensure only you can send emails from your domain, and that no one can spoof or fake your email address:
- Sender Policy Framework (SPF): Gives domain owners control over which servers can be used to send emails on behalf of an organization.
- DomainKeys Identified Mail (DKIM): Allows email recipients to understand if an email they received was sent and authorized by the owner of the sending domain.
- Domain-based Message Authentication, Reporting & Conformance (DMARC): Authenticates emails by combining the other two protocols, as well as giving domain owners a choice over what to do with emails that aren’t authenticated.
In this way, DNS authentication has two key functions:
- It demonstrates that the messages you send are legitimate
- It authenticates the emails you receive
3 Steps to Set Up DNS Records For Microsoft 365
- Verify You Own the Domain
Verify With TXT Records
Unsurprisingly, you can’t set up DNS records for Microsoft 365 / Office 365 until you prove that the domain in question is actually yours.
To do that, you need to follow these steps:
- Sign in to the admin center
- Click Show all > Settings > Domains and find the indicated TXT record
- Open a new browser tab, sign into your DNS hosting provider, and navigate to the place where your DNS settings are managed
- Head to your hosting provider’s DNS Manager page and add the TXT record to your domain. (N.B. this action won’t have any impact on your existing email. Once your domain has been connected to Microsoft 365, you can remove the TXT record.) It will look something like this:
| TXT name | @ |
| TXT value | MS=ms######## (unique ID from the admin center) |
| Time to live | 3600 (or your provider default) |
- Once you’ve saved the record, return to the admin center and click Verify
Your domain will be verified when Microsoft tracks down the correct TXT record. Bear in mind it typically takes about 15 minutes to register your changes, but in some circumstances it can take longer.
Verify With MX Records
Okay, so what if your domain registrar doesn’t actually support adding TXT records? Don’t panic, because you can use an MX record to verify your domain instead, as follows:
- Sign in to the admin center
- Click Show all > Settings > Domains find the indicated MX record
- Open a new browser tab, log in to your DNS hosting provider, and find where your DNS settings are managed
- Add the MX record to your provider’s DNS Manager page
A couple more points on this.
First, make sure the priority of your new MX record is set higher than any of the existing records for your domain, otherwise it might prevent emails from being sent and received. Remember to delete the record once your domain has been verified.
And secondly, you’ll need to use the following field values:
| Record type | MX |
| Priority | Any value higher than your existing MX records |
| Host name | @ |
| Points to address | Copy-paste the value from the admin center |
| Time to live | 3600 (or the default set by your provider) |
As with the TXT records method, your domain will be verified once Microsoft identifies the correct MX record.
- Add MX Records For Email
Next, it’s time to add MX records for email.
An important point before you get started: if your users already have email addresses containing your domain name — like [email protected] — it’s important to set up their accounts in the admin center before adding your MX records. Taking this step means they’ll still be able to receive email.
Also, note that when you’ve updated your domain’s MX record, any new email received by anyone using your domain will come via Microsoft 365, while any previously received email will remain with the current host. The only way around this is to migrate your email and contacts to Microsoft 365 as well.
Okay, now we’ve cleared that up, head to the Microsoft 365 admin center domain setup wizard to find the MX record.
Then visit your hosting provider’s website and add a new MX record, ensuring that the fields are set up as follows:
| Record type | MX |
| Priority | The highest value available (typically 0) |
| Host name | @ |
| Points to address | Copy-paste the value from the admin center |
| Time to live | 3600 (bear in mind Exchange Online only supports values of less than six hours, or 21,600 seconds) |
Finally, save the record and delete any other MX records that are in place.
- Prevent Email Spam With An SPF TXT Record
About 90 billion spam emails are sent every day — and a lot of them are malicious. So you should definitely take steps to prevent email spam.

An SPF TXT record will help you do that.
If you’ve already got one for your domain, there’s no need to create a new one specifically for Microsoft 365. Instead, simply add the values required by Microsoft 365 to the record on your hosting provider’s website, so you’re left with a single SPF record incorporating both sets of values.
Edit the existing record (or create a new one if required) and check the fields are set up as follows:
| Record type | TXT |
| Host | @ |
| TXT value | v=spf1 include:spf.protection.outlook.com -all |
| Time to live | 3600 (or your provider default) |
Then save the record and validate it using an SPF validation tool, such as:
Note: SPF is designed to protect against email spoofing, but it can’t safeguard you against all spoofing methods. For greater protection, you’ll also need to set up DKIM and DMARC.
And that basically wraps it up for email related records.
There are more DNS records you can add for Microsoft 365, but that is entirely dependent on the full range of tools and services Microsoft provides that you will be using. This article is keeping it simple, just sticking with email-related DNS records!
Using Microsoft 365 Email for Sales Teams and Lead Generation

If your company is looking to do sales lead generation via cold emailing potential customers, it’s important that you get everything set up properly or your account with Microsoft 365 can get suspended.
Of critical importance when sending cold emails is email deliverability. You don’t want your emails going to spam. You want them to reach your intended recipients.
To help with email deliverability, the first piece is your email authentication. Sending authenticated emails helps ensure your emails don’t bounce.
When you are first setting up your email address, it’s also important to warm up your email address. This basically means – don’t send 100 emails the first day your email address is set up, or you will look suspicious, your emails may go to spam, and your account may get suspended in Microsoft 365. Email warm-up entails sending a few emails per day to start, then gradually increasing over a few weeks. This can also ensure good deliverability.
Next up, if you are using a third-party sales automation tool with your Microsoft 365 email to send your sales led generation cold email outreach campaigns, it’s important to note that if you send too many emails at once, Microsoft 365 may flag your account and suspend it. Microsoft 365’s systems have rules to prevent high-volume mass-emailing. So you might want to set a limit of 30-50 emails per day per email address.
Lastly, it’s important that the people you are emailing are real, working, validated email addresses. If you email too many contacts where your email bounces because their emails were not real, working email addresses, your deliverability will decrease.
To Wrap It All Up
Congratulations, you’ve configured your DNS records for Microsoft 365!
Wasn’t so bad, as it?
Your next step is to lay the groundwork for high email deliverability to support the performance of your email outreach campaigns.
Find out how by reading our ultimate guide on warming up an email account.
FAQs
As of 2022, Office 365 has been renamed to Microsoft 365. It still includes the same suite of office productivity tools, just under a new brand.
Microsoft Outlook is an email client software application that enables you to access and send emails. Microsoft Exchange Server is the back-end software that enables you to manage your emails in Outlook. In short, Exchange does all the heavy lifting for Outlook.
Outlook 365 refers to the Microsoft Outlook email client software, hosted in the cloud and provided specifically by Microsoft. Separately, you can get Microsoft Outlook as your email client, installing it on your own servers. There can be some confusion here. But, the short answer is that anyone can install Outlook on their own email servers, but if you want Microsoft to manage it all for you, you do that via Outlook 365. Also, Outlook 365 is available as part of the Microsoft 365 suite of software.
If you are doing sales lead generation and want to integrate your email account with a sales automation tool, some things to keep in mind are that Microsoft 365’s systems have rules to prevent high-volume mass-emailing, so if you send too many emails at once, your account can get flagged and email suspended. You are also better off if you can do some email warmup to get better deliverability.
Free 14-Day Trial
Start building relationships now with your fully-featured 14-day trial!
How We Compare
Terms | Done-For-You Terms | Privacy | Write For Us | Press
© 2025 Postaga. All Rights Reserved. Made with  in Boston.