Mail merging allows you to send personalized letters and emails at scale.
Why would you want to do that?
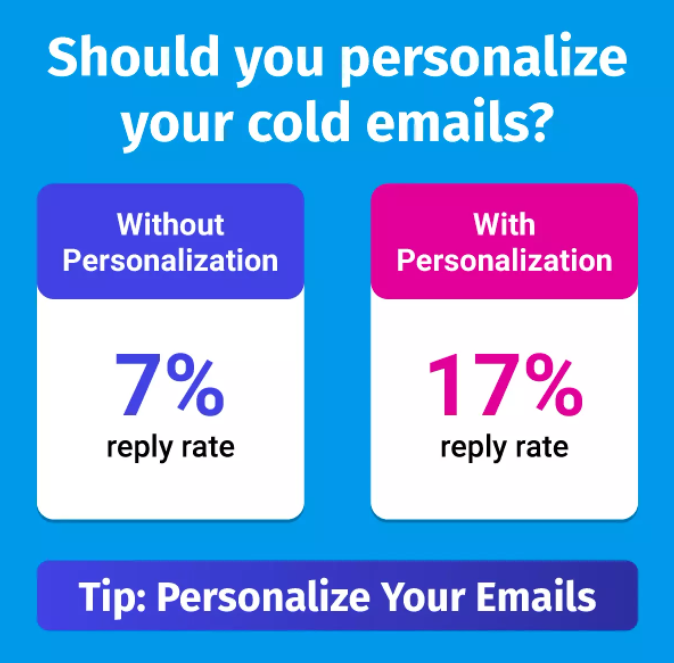
Because emails with advanced personalization see more than double the response rate of emails without personalization.
So you want to learn about mail merge for Excel.
But you need to know that it takes more than just an Excel spreadsheet to complete the mail merge process.
Excel merely contains your list of contacts and unique personalization information you want to include for each contact in the contents of your mail merge. To do a mail merge, you also need to do your own prospecting, insert and organize your data in Excel, and write your email template in Word.
In this step-by-step guide, I’m going to talk through:
- What mail merge is and when to use it
- How to use Excel for mail merge
- Shortfalls of using Excel for mail merge
- Potential mail merge alternatives
Sounds good?
Then let’s get into it!
What Does A Mail Merge Do?
Mail merge lets you automatically create unique content for many different people. The most popular applications of mail merge are for creating emails or mass letters that use a template but have unique information for each contact. Another popular application is using a mail merge to create address labels for envelopes.
What goes into an email mail merge?
First, you write a templated email full of placeholder text…
…then the mail merge replaces the placeholder sections with personalized details pulled in from an external data source, such as an Excel spreadsheet.
That way, you can craft more engaging, impactful emails by incorporating information like:
- The contact’s first name
- Their company name
- A recent post they’ve written
- Job title or position in the company
- Their company’s website
And much more besides!
There are many different ways to do a mail merge, and not just with Microsoft Excel. You can also do a mail merge with Google Sheets and also Gmail.
Why Should You Consider Mail Merge?
I’ve already given you one stat that highlights the benefits of personalized emails.
Now here’s another:
According to Yes Lifecycle Marketing, emails with personalized subject lines see 50% higher open rates than those with a non-personalized email subject line.
Yet, bafflingly, that same study found just 2% of more than seven billion emails it analyzed contained any personalization.
Which is where mail merge comes in.
It means you can send bulk emails without making it obvious that they’re bulk emails.
Best Mail Merge Use Cases
You’re most likely to benefit from mail merging if you’re:
- Sending personalized bulk emails
- Sending formal letters
- Creating envelopes
- Sending brochures
- Writing HR emails
- Creating event emails
In most of those examples, the “thing” you’re writing is largely generic information that stays the same for every recipient — like the location of an event or the features and benefits of your product. Personalization enhances the message, making it more likely to cut through and generate the desired response.
The only exception is number #3, because there’s a good chance all the information on your envelope will be unique to the individual recipient.
Easy Steps For Sending Bulk Emails From Excel
Enough theory; let’s get into the specifics of how to use Excel for mail merge.
For doing a mail merge in Excel to send personalized emails, you will need:
- A list of contacts that you want to email
- Microsoft Excel to manage your list for the mail merge
- Microsoft Word for creating your mail merge document / email
- Microsoft Outlook for sending the emails (and also an email address that is set up in Microsoft Outlook)
And that’s it.
You don’t need any third-party plugins or add-ons. You don’t need Gmail or Google Sheets or anything like that.
Step 1: Prepare the Data for Mail Merge In Excel
Before you’re ready to start the mail merge process, you first need to build a mailing list.
Unfortunately, two in five salespeople say prospecting is the most challenging part of the sales process, meaning the first step is arguably the hardest.
(Hint: Want to build a stronger list of recipients? Check out my guide on how to build the perfect prospect list for your email outreach campaign.)
Having created your list of targets, it’s time to make your Excel spreadsheet.
This is the data source for your recipient list, so it’s vital you get it right.
Excel has two dimensions – Columns and Rows.
Columns – listed as letters A, B, C, D, etc. – will each have their own unique data point (e.g. one column will be for “Email Address” and another will be for “First Name”)
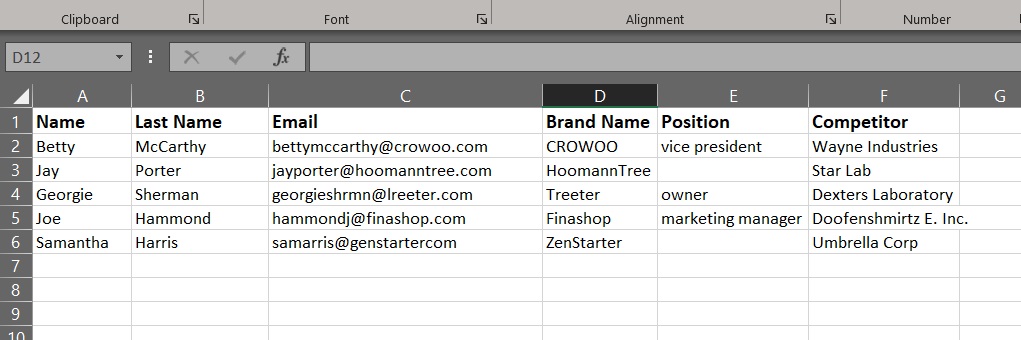
Rows – listed as numbers 1,2,3, etc. – will have all the information about a specific contact.
The header row – i.e. Row #1 – should be used for labeling each column.
So, Row 1 might look something like this:
In this header row, one cell will be called “Email Address”, another will be called “First Name”, etc.
These best practices will help with your mail merge:
- Match the column names from your table header in your spreadsheet to those of your actual merge fields. So if your merge field says {{Discount code}}, don’t write “Promo code” in the column header.
- Ensure the first sheet of your spreadsheet contains all the data to be merged (don’t use multiple sheets)
- Use the correct formatting with your cell values when using percentages, currencies, dates, and other numeric values. Otherwise, Word might not understand them.
- Save the mail merge spreadsheet to your local computer drive.
- Make any changes or additions before connecting the spreadsheet to your Word mail merge document.
Step 2: Craft The Mail Merge Document
Now it’s time to connect your existing data source — in this case, the Excel spreadsheet — to your mail merge document in Word.
Open Word, create a new blank document, then press the Mailings tab in the main menu and select Start Mail Merge.
This will open a drop-down list of options, from which you’ll select Email Messages.
Your goal here is to craft an email template that’s relevant to your email recipients.
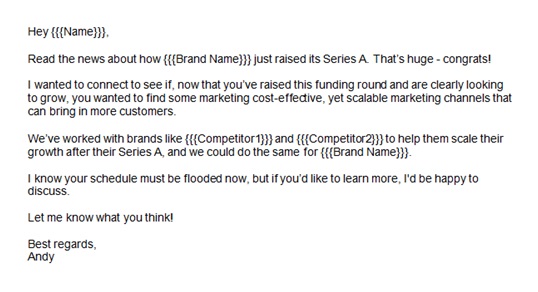
While it’s not totally necessary, I find it easiest to include placeholders for the parts of the email I’m planning to personalize, like this:
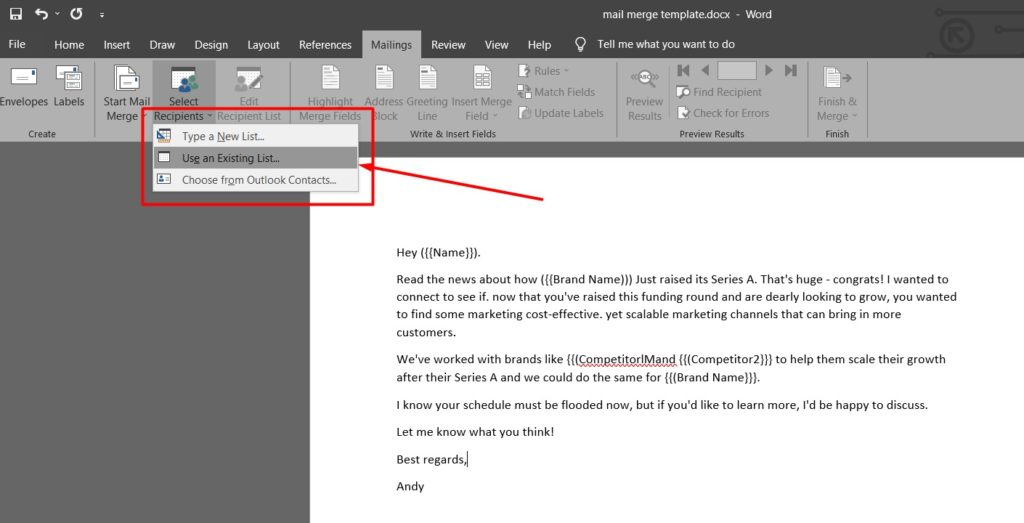
Finally, for this stage, you’ll want to select your Excel recipient list by:
- Clicking the Mailings tab
- Hitting Select Recipients
- Selecting Use an Existing List and choosing your Excel file
Hint: This means your Word document is now connected to the Excel spreadsheet. Don’t do this until you’re happy with the content of your email template!
Step 3: Personalize By Inserting the Merge Fields
This is where the magic happens!
Having linked your spreadsheet and Word document, you can use the Insert Merge Field option in the Mailings tab to pull the desired information in your template.
Simply highlight the field you want to replace with the personalized data in your spreadsheet and choose the correct column headers from the drop-down menu.
Repeat this step until all your placeholder text has been replaced with database fields.
Step 4: Previewing Your Mail Merge
The last thing you want is to send hundreds or thousands of emails full of garbled, incorrectly merged information.
So do yourself a favor and take the time to sense check your mail merge.
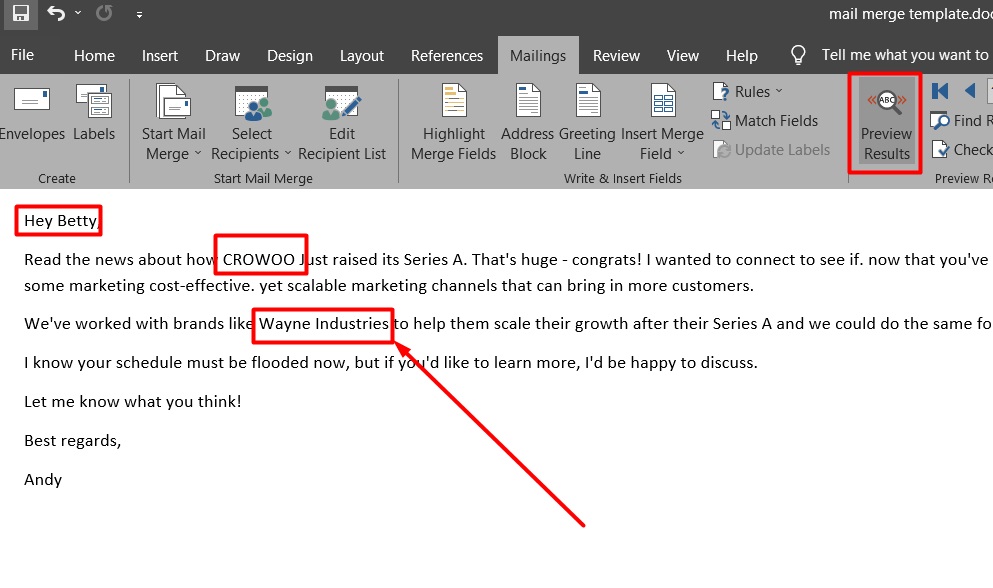
Hit Preview Results in the Mailings tab and your merge fields will be auto-filled with data pulled from the first row of your Excel spreadsheet.
Fix any errors, tidy up anything that doesn’t read right, and move onto the last step…
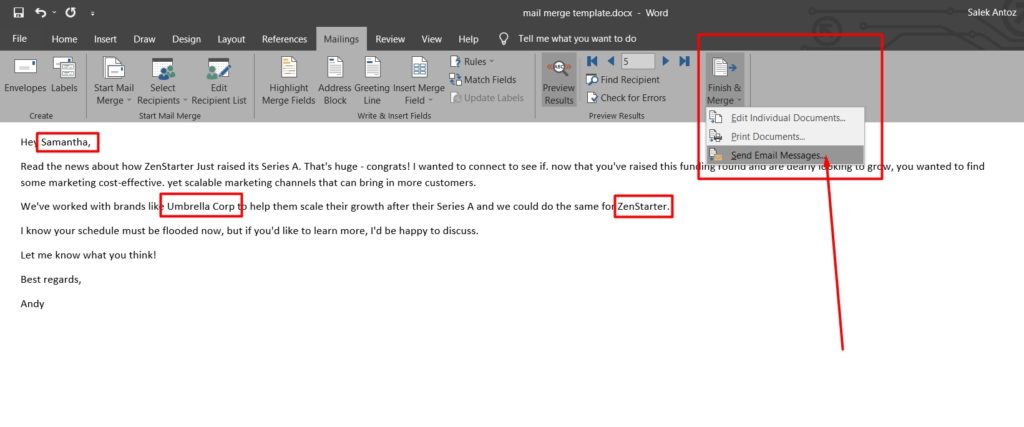
Step 5: Finalize The Document
To finalize the mail merge process, head back to the trusty Mailings tab and click Finish & Merge.
Here, you’ll be presented with a list of options regarding the type of mail merge you’re performing:
- Edit Individual Documents. For when you want to further edit each separate document.
- Print Documents. Use this if you’re planning to print and post individual letters.
- Send Email Messages. This option enables you to send your template message as personalized emails.
Selecting Send Email Messages will open a dialog box containing message options.
In the To: field, choose the table header containing all the email addresses:
Enter your desired text into the Subject Line field and choose All in the Send Records section.
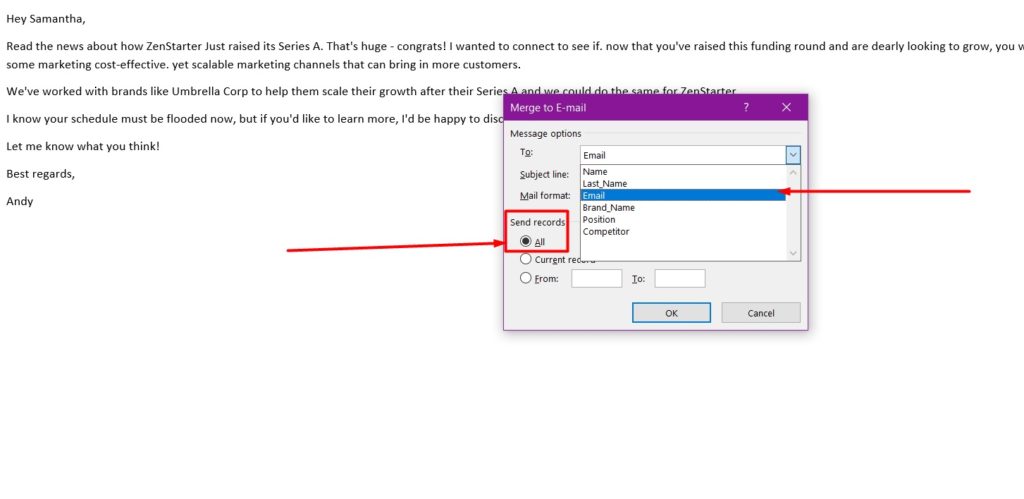
Hit the OK button and your newly personalized email marketing messages will be automatically added to your Outlook outbox.
Last but not least, save and close your merged document. That way, you can reuse it for future cold email campaigns by simply reopening the Word document.
Excel Mail Merge Disadvantages for Email Campaigns
The process of sending bulk emails through a combination of Excel, Word, and Outlook is simple enough, but it’s by no means perfect.
From personal experience, here are the biggest problems I see with mail merge for Excel:
- Setup issues. A single issue with a custom field or your column names can wreck your whole campaign, turning your messages into a jumbled mess.
- Spacing issues. Word sometimes adds extra spaces, or you might have added (or forgotten to add) a space in your template. Also, Word picks up blank lines in Excel spreadsheets. Any of those issues can break your mail merge.
- No alternatives if data is missing. One nice thing about using an email outreach tool is that if a placeholder is empty, like, for example if you are missing a First Name, there are backup options for what to include. For example, if your first line is, “Hello {{First Name}},” and you don’t have a first name for the contact, you might have a blank space in the mail merge. But, if you are using outreach software, you can have a fallback value, such as “Hello there,” in the event you are missing a contact name, and the email will send and not look off.
- Formatting issues. Standard formatting options — like bold text, underlining, and italicization — are a headache for mail merge.
- Not detecting all the records. Certain information might be skipped in the mail merge process, often due to incorrect formatting or improperly delineated column names.
- Trouble matching personalization. If your inserted field names don’t exactly match the column names in your spreadsheet, you’ll see an “invalid property” error message.
- Difficulty setting up automatic follow-up emails. Two-thirds of unanswered sales email chains stop after the first message. That’s a lot of missed opportunities that could be potentially avoided by sending a follow-up email (or multiple follow-ups). Sadly, if you’re using mail merge, you can’t send automated follow-ups.
- No simultaneous data editing option. When your data source for a Word document is an XLSX file, Word doesn’t allow you to edit it simultaneously.
- No advanced mail merge features. The mail merge options with Excel / Word / Outlook for sending emails are pretty basic. If you want to send a sequence of emails, set a time window for when you want the emails to send, etc., that’s not really possible.
What’s the Best Alternative to Mail Merge for Excel?
Sure, you can use mail merge to send personalized emails at scale.
But if you want to create a personalized bulk email campaign — one that generates real results and has a sequence of follow-up emails for people that do not reply — you need cold email automation tools, not mail merge.
That’s where Postaga comes in.
Using Postaga for your cold outreach sales email campaign allows you to:
- Craft multi-step email sequences that are unique to each recipient
- Stop campaigns when you receive a reply
- Get a higher email sending limit than with Gmail or Outlook
- Access reports to help you monitor and optimize campaign performance
- Schedule emails to send at specific times to improve your open and reply rates
- Ensure a high deliverability rate, keeping you away from spam folders
Not only that, but you get built-in tools for prospecting and warming up your email account, superior personalization options — including images, gifs, and videos — and lots more delicious cold outreach features.
To Wrap It All Up
The biggest advantage of mail merge is that it’s (almost) free, with an Office 365 business subscription costing about $13 per user.

But think about all the time it takes to build cold email campaigns with Excel and Word. You don’t have to stick to using Microsoft office products you can do mail merge using google docs as well.
And think about all the stuff you can’t do, like building sophisticated, personalized email sequences with automated follow-ups. There are so many drawbacks with mail merge. If you don’t want to deal with so many complications, it is better to avoid mail merge altogether.
Replicating that with mail merge requires a ton of extra “busy work”.
Wouldn’t you prefer to spend your hard-earned time on something more valuable and impactful?
If the answer’s “yes”, take Postaga for a spin with our 14-day free trial!
Free 14-Day Trial
Start building relationships now with your fully-featured 14-day trial!
How We Compare
Terms | Done-For-You Terms | Privacy | Write For Us | Press
© 2025 Postaga. All Rights Reserved. Made with  in Boston.