Guest Post Outreach
Knowledge Base
With the Guest Post campaign type, you can find websites where you can submit guest post articles.
Writing guest posts is a popular link building strategy that can earn you backlinks from authoritative websites.
With this campaign type in Postaga, you can search for blog post topics relevant to your areas of expertise.
Postaga will then find websites that have featured content on these topics, perfect for you to pitch your guest post for their audience!
Creating a Campaign
First, we create a new campaign.
Next, for the campaing category, you are going to choose “Promote a Blog Post”

Under the campaign type, you are going to choose Guest Post.

Guest Post
Next, we choose a keyword to search for topics of articles on your areas of expertise.
You can try out different keywords relevant to you.

Once you make a search, Postaga will return results. On the left side of each result, you can check them to include them in your outreach.
You can also select all or select none.

In the next Links stage, Postaga will give you results of different websites along with flags to let you know if the blogs either: A) have unique guest post guidelines published on their website; or B) Postaga cannot find a blog for this website (which means you might want to skip reaching out to them).

Links
Postaga will then give you a list of the links to the websites you selected, along with a target contact for each website.

Here, you have options for Basic Configuration and Advanced Configuration.
First, let’s review Basic Configuration.
Postaga will automatically try and find the best fit contact for each website.
As an example, for a blog post, that will usually mean the author of that post. Otherwise, Postaga will look for its determination of the next best-fit contact.
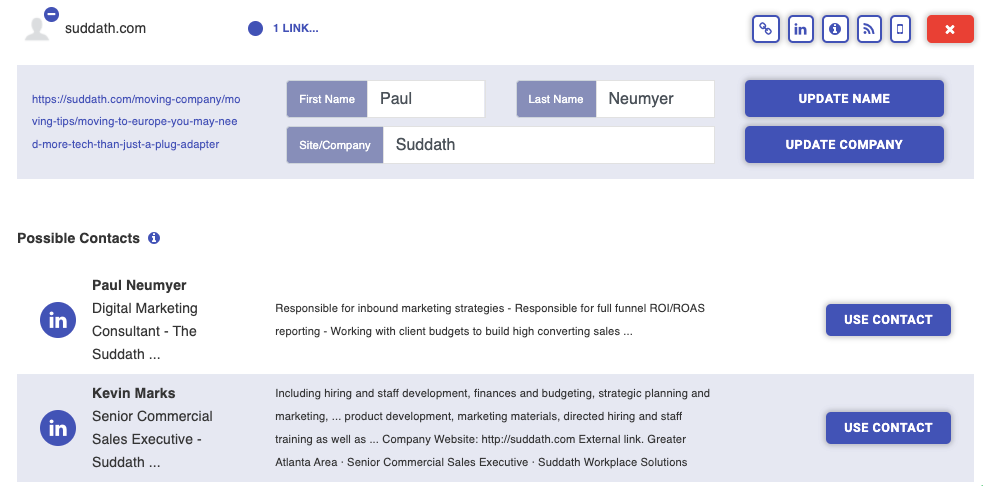
You can review each website and contact by clicking the "1 link" button, on a specific contact, which will then show you the target contact for that website.
The First Name, Last Name, and Site/Company fields are all editable.

If you would like to search for a different contact, Postaga can help there too.
If you see a + symbol next to the website, you can click it, and you will get results of other contacts at the website that you can choose from. Then, if you click the Use Contact button, you can select that contact.
Next, there’s Advanced Configuration.
In Advanced Configuration, you are presented with every merge field for the website, including custom merge fields. You can fill these boxes if you want, or do that later.

Once you are satisfied, click the Get Contacts button.
Now, you will see the contacts.

On the left side of the screen, next to each contact, is a checkbox. With the box selected, that individual contact will be added to your email sequence.
Though you will see email addresses for each contact, some information may not be available, such as name, company, position, social media handles, or any custom contact merge fields.
If you would like, you can supplement that information and add that to contacts by filling it in the appropriate text boxes.
Also, you can edit existing contact information text boxes. As an example, if the Company Name returned is Acme Company, Inc., but you want to just refer to the company in merge tags as Acme, you can edit that field as needed.
Next to each email address found is a numerical contact score. This indicated how confident we are that the email address is accurate. If the contact score shows as red, you can click the score to bring up a validator and try to validate the email through Mailgun.
To the right of each contact are icons for Twitter, Linkedin, the original link, and a few other key pages at that contact’s website.
If a Twitter handle is provided , clicking the Twitter icon will load up a default tweet, presuming you are already logged into Twitter. Otherwise, it will perform a Google search for the Twitter handle of the contact.
If a LinkedIn url is found clicking the LinkedIn icon will load the contact’s LinkedIn profile. Connecting with a contact on LinkedIn before emailing can be a great way to increase response rates. If a LinkedIn url is not provided, clicking the icon will perform a Google search for the contact’s LinkedIn profile.
Clicking the link icon will take you to the original link.
You can also toggle between Basic Configuration and Advanced Configuration to make edits to all available merge fields.
Once you are satisfied with the outreach contacts, you can move onto editing the email sequence.
Email Sequence
Next, you will choose an email sequence for your contacts.

Email sequences available to you will include any sequences that you created and assigned to this particular campaign type, sequences assigned to “any” campaign, as well as template sequences created by Postaga.
Once you select a sequence from the drop-down menu, you will see the sequence laid out on the screen.
If you are not happy with the sequence, you can always modify the sequence by going to Sequences in another window by clicking the edit button to the right of the selected sequence. Then, you can edit the sequence, save it, and then reload the sequence section in you campaign by clicking the Load Sequence Changes box below the sequence.
Related Help Doc: Sequences
Email Preview
Next, you will see an email preview section with the email templates of the sequence you selected.

On the left side of the page are the list of emails as well as contacts who will receive each email. If you click on a specific contact as well as a specific email, you will see that email as it will send to that specific contact in the preview pane on the right side of the page.
If there are merge fields used in your email template, they will fill with the supplied information in the preview pane.
However, you may also see merge tags in red. If you see red merge tags, it means that Postaga does not have data for these merge fields. You can always go back and provide that information to see how the revised email will look with the new information.

Alternatively, you can edit the email by clicking the edit icon to the right of the email, then clicking the Load Email Changes button to see how the revised email will look. Any changes here will affect the template, and therefore, every message using that email template.
It should be noted that red merge tags do not show up in outreach emails. If there are any red merge tags when you send out your campaign, they will disappear from the outreach email and your contact will not see anything where the merge tags would have been.
You can overwrite individual emails in this section as well. To do so, just hover over the email, and you will see the screen darken and an edit icon appear. This will let you edit an individual email in the sequence, related to the contact that is highlighted in the left side of the screen.
Once you click the edit button, a modal window will pop up, allowing you to edit that unique email.

One cool feature to note here is that you can insert unique snippets to your personalized email. For example, let's say you want to mention something specific on your contact's website that you appreciated. Postaga's AI pulls mention-worthy snippets from your contact's post or URL, so you can paste it in your message.

Once you are happy with the edits you have made, click the Save Email Overwrite to save the individual email, or Close to undo any changes.
To send a test email, click the Test Email button below the email in the preview pane. Then, enter the email address for the test and click send.
Rules and Scheduling
Next, you will set the rules and schedule for your email.

The Schedule button has a checkbox option. If you select it, you will be able to schedule your sequence to run at a given day and time. If not selected, the sequence will run as soon as you click the Launch button at the end of this campaign screen.
If you select a schedule, click the text box under Start Date to select a start date and time.
Below the schedule button is a Testing Mode button. If selected, the email sequence will send all the emails to your test email address, but not your actual target recipients. This is generally used for situations where you want to confirm what emails people will receive, though you can also do this in the Email Preview section.
There is also a Send on Weekends option that you can select. If it is not selected, your email sequences will only send on Monday through Friday; any emails that would have been scheduled to send on a weekend day will send on the first following weekday (e.g. if scheduled for a Saturday or Sunday but “Send on Weekends” is not selected, it will send on Monday).
There is also a rule for Stop on Reply. If selected, the sequence will stop for a specific recipient if they reply to any of your emails. For example, if I have an email sequence with 5 emails, and a recipient responds to my 2nd email in the sequence, the sequence will stop for them and they will not receive emails 3, 4, or 5.
Track Opens lets you know if your email opens are being tracked. If you have configured your Postaga account fully, this should say “Opens are automatically tracked.”
Schedule and Launch
With your campaign created, it’s time to launch your campaign.

Free 14-Day Trial
Start building relationships now with your fully-featured 14-day trial!
How We Compare
Terms | Done-For-You Terms | Privacy | Write For Us | Press
© 2025 Postaga. All Rights Reserved. Made with  in Boston.